
How to Encrypt an Email in Outlook
 Sabrina McClune
Email is not always secure. Messages can be intercepted or manipulated at multiple points in their journey from sender to recipient.
Encrypting your emails can help to protect your privacy and security by reducing the chance of interception.
Here's how to encrypt an email in Outlook.
Microsoft Outlook offers simple encryption methods that enable users to safeguard their emails in transit.
This guide walks through how to encrypt an email in Outlook using the most common method: S/MIME.
S/MIME encryption is a widely used protocol for encrypting email communications during transit.
How to Encrypt an Email in Outlook
To encrypt your email in Outlook, you will need to create a digital certificate.
A digital certificate functions like an internet passport. It verifies your identity and allows you to send encrypted emails and access secure websites.
Both the sender and the recipient must have a valid certificate linked to their email accounts to use S/MIME encryption.
Step 1: Set Up a Digital ID in Outlook
Before enabling S/MIME encryption in Outlook, you’ll need to create and set up a Digital ID certificate within Outlook.
If you don’t already have a Digital ID, Microsoft recommends some Digital ID service providers.
Your organisation may have specific policies regarding the use of digital IDs and certificates, so if in doubt, contact your network administrator.
Once you have downloaded your Digital ID certificate, you'll need to add it to your Outlook client:
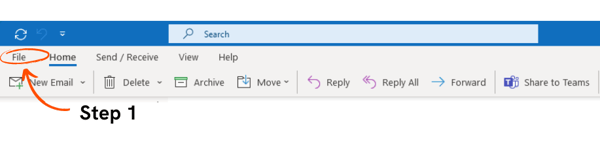
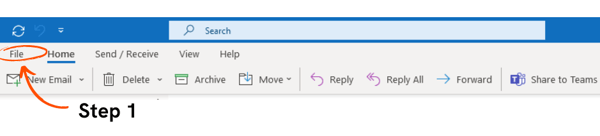
- Open Outlook and click on the ‘File’ tab.
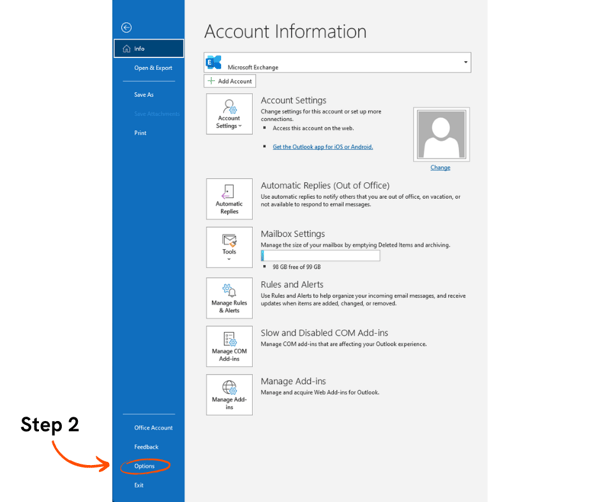
- Select ‘Options’ at the bottom left of the menu.
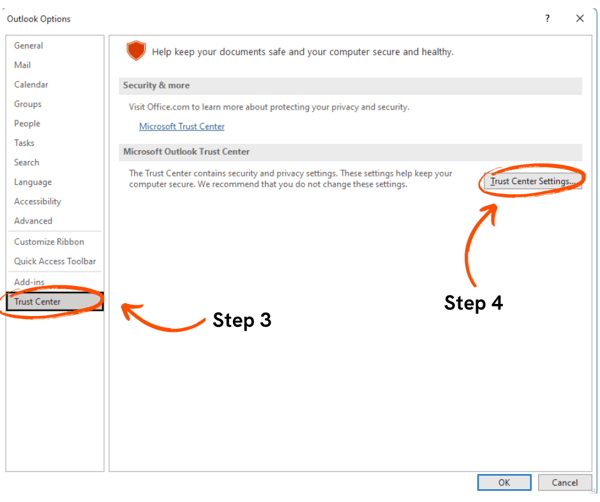
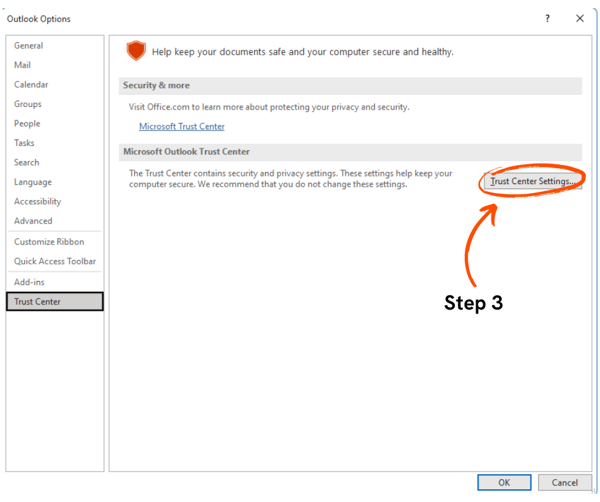
- Click ‘Trust Center’ on the left-hand side.
- Press the ‘Trust Center Settings’ button.
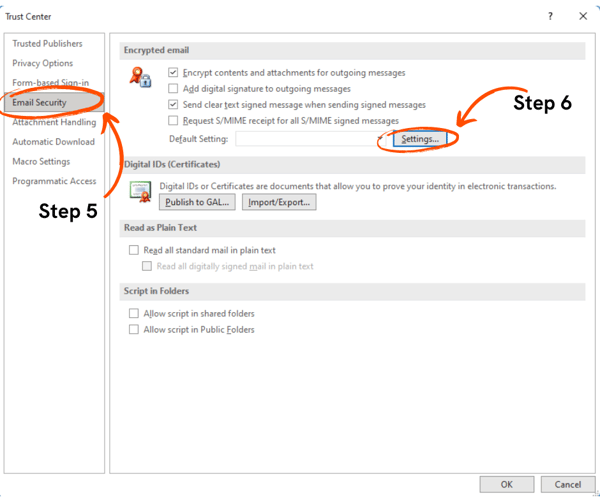
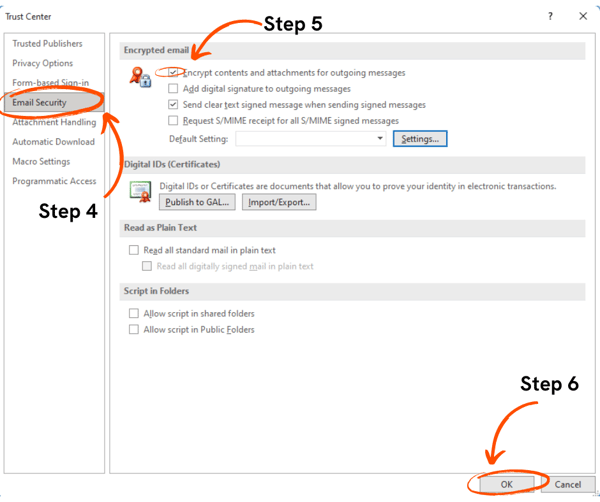
- Click the ‘Email Security’ option in the menu on the left.
- Press the ‘Settings’ button under the ‘Encrypted email’ section.
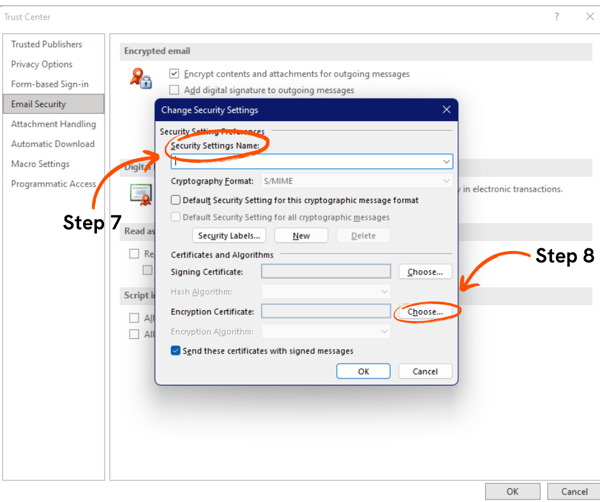
- In the ‘Security Settings Name’ field, give your settings a name.
- Under the ‘Certificates and Algorithms’ section, click ‘Choose’ to specify the digital ID you wish to use.
Step 2: Enable S/MIME Encryption in Outlook
Once your Digital ID is set up, you can enable S/MIME encryption in Outlook. Follow these steps:
- Return to Outlook and click ‘File’ in the menu bar.
- Select ‘Options’ and click on ‘Trust Center’.

- Within the Trust Center, choose ‘Trust Center Settings’.
- Click the ‘Email Security’ option in the menu on the left.
- Check the box next to ‘Encrypt contents and attachments for outgoing messages’.
- Click ‘OK’ to save your settings.
Step 3: Send an Encrypted Email
With S/MIME encryption enabled in Outlook, you can now compose and send an encrypted email:
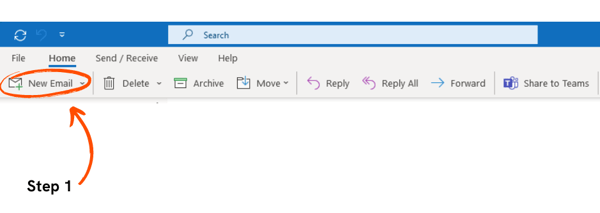
- Open Outlook and click ‘New Email’ to create a new message.
- Compose your email as usual, adding the recipient(s), subject, and message content.
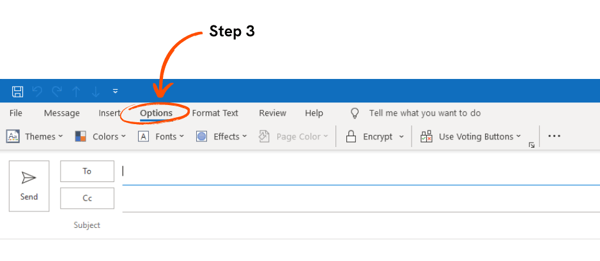
- To encrypt the email, click on the ‘Options’ tab.
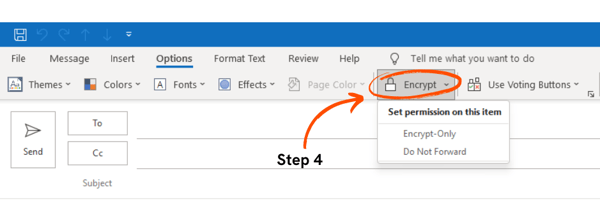
- Within the tab, click on ‘Encrypt’ in the ‘Permission’ group. Choose encryption only or apply a no-forwarding rule.
- A message will appear above the ‘To’ field confirming encryption.
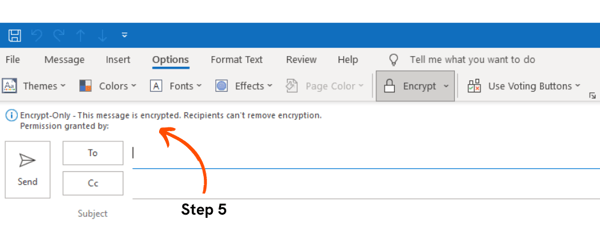
- Click ‘Send’ to transmit the encrypted message.
Step 4: Decrypt an Encrypted Email
When you or your recipient receives an encrypted email, Outlook will automatically decrypt it:
- Open the encrypted email you received in your Outlook inbox.
- Outlook will automatically decrypt the message and display it.
- Read the decrypted email as you would any regular email.
| Note: If you have an E3 or E5 Microsoft 365 plan, you may have access to Microsoft’s more advanced secure email method, Microsoft Purview Message Encryption. Learn more in our Microsoft 365 secure email vs Mailock review. |
Securing Highly Sensitive Emails in Outlook
Encrypting your emails is a practical way to reduce the chance that message content is read in transit.
For highly sensitive information, though, encryption is usually one layer in a wider security setup rather than a complete answer on its own.
If you need controls beyond certificate-based encryption, such as checking who can open a message or withdrawing access after send, dedicated secure email tools may be a better fit.
Several secure email solutions add protections on top of standard Outlook encryption, including Mailock.
The Mailock Outlook add-in adds capabilities inside Outlook, such as:
- Recipient authentication
- Compatibility with all email clients
- Complete audit trails
- Email revoke
FAQs
What Is the Main Security Issue Covered?
The article explains encrypt an email in outlook and the risks it can create when sensitive information is sent or accessed by email.
What Controls Should Teams Consider?
Teams should look at access controls, authentication, encryption, staff training, recovery processes, and evidence of message activity. The right mix depends on the information being handled.
How Does Mailock Fit the Topic?
Mailock supports secure email workflows with protected access, recipient authentication, secure replies, message tracking, and audit trails.
References
Find Digital ID or Digital Signature Services, Microsoft, 2024
Reviewed by
Sam Kendall, 31.05.26
Sabrina McClune, 17.06.25
This content is for general information only and is not legal advice.
|
Originally posted on 02 06 23
Sabrina McClune writes about cybersecurity, data protection, digital identity, and digital transformation for Beyond Encryption, helping regulated sectors understand complex technology and compliance topics with greater clarity. |
Email Series
Subscribe to
.svg)
Subscribe to Privacy Decoded, our monthly email briefing about privacy, digital trust, and the forces shaping our online world.